|
|
|||||||||||||||
 |
|||||||||||||||||||||||||||||||||||||
|
Kayhacking. “Kayhacking” - or the “art” of ruining a perfectly serviceable kayak, whilst attempting to make it more fit for its owner to use. Disclaimer – I’m doing these “experiments” so that you don’t have to, unless you really, really, want to. If you take the plunge you are totally responsible for anything you subject on your own craft and for ensuring you take all appropriate safety precautions … including that you do nothing to adversely affect the safe use of your kayak.
Quick Links ...
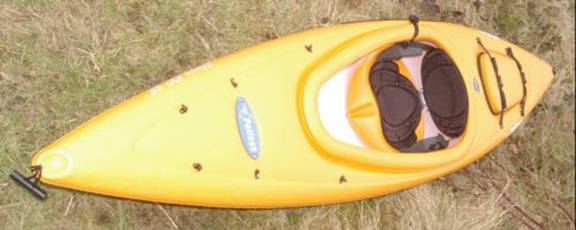
My kayak is a Pelican (Coleman) Storm 100SE, it’s 10 ft long & designed for basic pleasure use. It came with a paddle and spraydeck. Web reviews state that it’s stable and tippy and that it tracks well but also that it doesn’t. Mine seems to track well but can be fairly tippy with me in it, but that might just be me! If I was buying a kayak now, I’d join a club, try their kayaks, get advice & buy from a supplier that let you go and test their yaks before buying (see links page). ~35yrs ago I did a little bit of kayaking, I could roll one … and my self-set challenge is to re-learn and to be able roll my Pelican. I tried rolling in the unmodified Pelican and I just fell out. I tried locking my knees tightly under the sides of the cockpit, but can’t really do this using the small adjustable footrests. I cut up my knees on the edge of the cockpit and I still fell out when I tipped over. A temporary fix was to tape pipe insulation foam tube under the cockpit rim … no cuts or grazes but I still fell out. Primary Stability is how steady the kayak is/feels when you first try to get in, so if it’s got a wide flat bottom it’ll have good primary stability. Mine has a V hull, so it rocks a bit as I get in. Secondary Stability (if I’ve got this right and apologies to Matt if I didn’t learn this correctly) is a measure of how progressively the kayak will tip before inverting. I think there should also be Tertiary Stability ... i.e. how stable is it in an inverted position? As the Pelican 100 has a fairly wide flat upper deck it’s not going to be the easiest thing to roll back upright again, oops! Initial things I’d like to change …
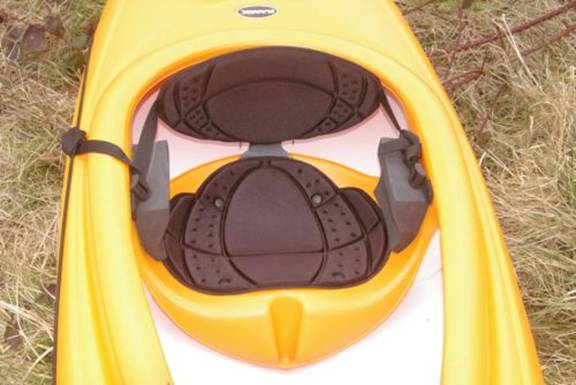
Hip-Pads. Pyranha self-adhesive hip pads, from Kayaks North West. Sit in the kayak, move pads about till finding a good supporting position with you tightly wedged in. I didn’t need the extra supplied shims. Mark around pads with marker pen so that the supports can be stuck back in same location(s). Wipe areas with meths to degrease, gently warm kayak locations with heatgun/hairdryer, peel plastic backing from adhesive on pad(s), carefully locate and press down hard. If attaching to curved surface it helps to pre-bend the pads to the curve before applying.
Foot plate … can be supplied by Kayaks North West, but I had a small sheet of 8mm polypropylene in the garage that I could use. Safety Note: Don’t use/do anything that could create a foot pinning trap … if you roll you have to be 100% certain that you can get out rapidly & safely each and every time. A plate that feet can’t get past is far safer than a bar. I sat in the kayak and carefully positioned the footrests at the best slots for me.
An old scrap piece of twin-wall plastic was used to make a template for the new footplate. Cardboard or anything could be used, but if you can see through it to some extent it helps (as you’ll see). I tried to ensure my template gave ~1cm clearance from the kayak skin all the way round. The gap would be bit more than that at the keel due to the width of my polypropylene sheet. I unscrewed the foot rails to get out the rests and then discovered that I could have just slid them out forwards by pressing a detent strip at the front of the rail. The original plan was to use some hefty stainless nuts, bolts and washers to hold the footplate in situ. Having taken out the rests this was revised and sizes were sourced such that the locknuts were a tight fit into the moulded slot on the rear of the footrests.
Clearance holes for the bolts were drilled through from the rear of the footrests angled to be parallel with the kayak centreline when re-fitted. The bolts were pushed through the holes from the front, threaded onto the nuts and used to draw the nuts into position. The rails and rests were then refitted. The rests were positioned 1 slot further in than the location where the footplate should finish. The template was held in place on the footrests and the bolt positions marked, it really helped that I could see through my template. The footplate template was marked out on the polypropylene sheet, it was cut out using a Dremel and a rotary cutting blade. The bolt holes were also drilled and countersunk. 4 discs were cut from an old karrimat, the same diameter as the footrests. These were glued together in pairs and holes cut through their centres making 2x 20mm thick “doughnuts”. These discs were then glued on the reverse of the new footplate centred on the bolt holes. These cushion the footplate when it is screwed into place. The new footplate in situ …
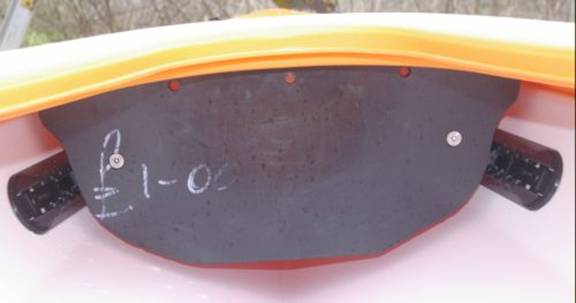
And the result is … I can now up-tip my kayak, knees pressed against the inside of the cockpit rim, and stay in place even when I try rolling … even if I still don’t get it upright. My kayak comes with shock cord straps on the front to tie down anything useful and a similar strap on the side to retain the paddle, should you not be holding it at the time. On older Pelican kayaks (Pelican Zoom) such straps were riveted in place and watertight.
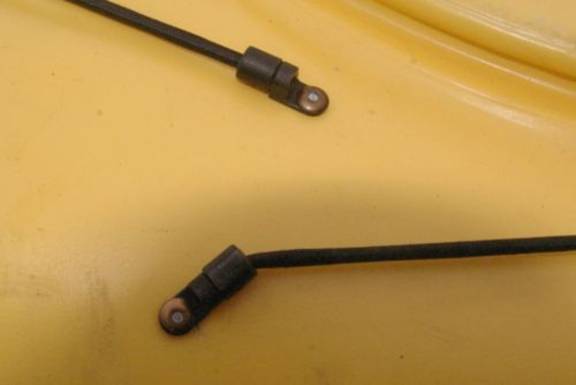
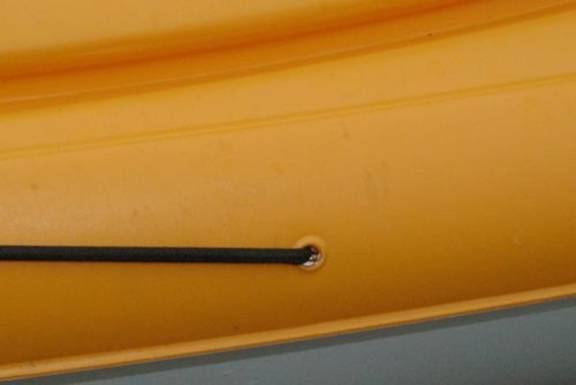
On the 100 however the strap ends go through strengthened (the skin is thicker) holes. A toggle fitting on the elastic cord goes through the hole and opens to hold the cord in place, these fittings facilitate replacement but are not water/air tight.
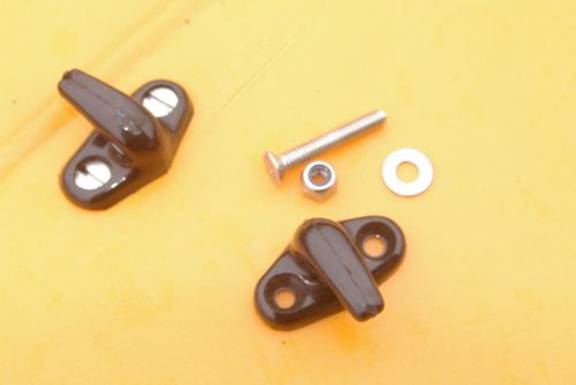
To reduce possible water ingress I’ve plugged these 6 holes, I removed the cords, used the Dremel with a grinder wheel to flatten the ridges around the holes and fitted marine hooks instead (sourced from Shipshape Marine, Stockport). I cut down the bolts so that they only just come through the plastic collar of the locknuts when they are in place … so they don’t burst any buoyancy bags I might fit later. If you do something like this take real care as to where the holes you are drilling go as it’s easy to make holes but not so easy to take them out again. Carefully check where the internal seams etc are.
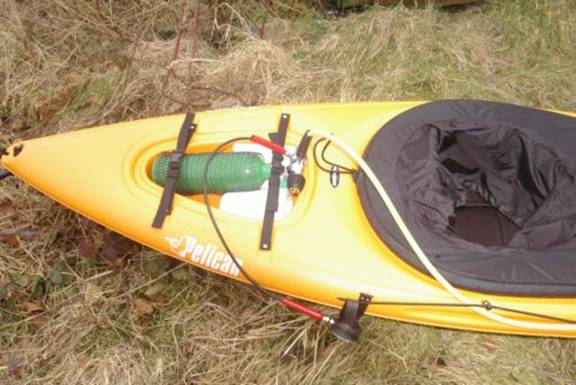
It’s been tested with loops tied in the ends of shock cording but these will now be whipped instead for neatness. Now here’s a daft idea to frighten pool attendants and safety people. Can a kayak be fitted with diving gear for use on still water in practicing rolls? Years back I was a BSAC qualified dive leader and I still feel competent to play at the surface. Moving water with rocks etc. wouldn’t be good at all for a pressurized air tank … so just don’t go there! Initial thoughts …
Advice, tank, 1.5metre octopus hose, other oddments and air fills sourced via Roger at New Horizons in Macclesfield. Kayak hatch cover de-riveted to facilitate removal.
A foam tube (that Andrex put toy pups in when they were free with packs of toilet rolls) was cut in half to provide tank supports. Kayak straps hold tank in place, wrist strap used to hold pressure gauge in place on paddle support elastic. Front elastics hold demand valve in easy reach for when needed. The sub …
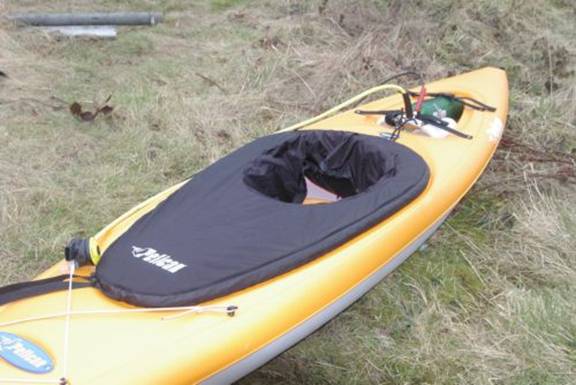
Well … does it work? Oh yes, but you really need to let the pool/safety staff know that you have a dive tank fitted and can stay under for what seems like ages without drowning, at least you should if you wish to be allowed back in the pool again. Problems – clearing the mouthpiece (demand valve), you either need a really good blow (like clearing a snorkel) or use the purge button … as when you first use it you (and it) are upside down and demand valves clear far better when they are the right way up ... otherwise your first breath will be of water. Immediately above you is a large expanse of spraydeck which collects all the air you breathe out and it domes back up into the kayak, look at the picture below and imagine it. You then spend more time trying to hold/replace the sides of the spraydeck than you do trying to roll.
The best bit ... if you can breathe underwater, you can scull the inverted kayak to the side of the pool, grab the side and flip yourself upright again should your roll attempts still not work. I spent well over 10mins playing underwater, more like 20mins and I still have over half a tank (120Bar) of air left. I wonder what the World Speed Record for a pool length transit in an inverted kayak is? I’m getting to be pretty good at capsizing and filling my kayak with water and slightly frustrated at having to tip it all out again when my roll attempts go wrong. The 100 holds an amazing amount of water ... so how about a bilge pump? Water and electrics are not the best of companions and you can place bets that with an electric one the battery would be flat when it was needed. I can’t see the point of the hand held bicycle types ... remove spraydeck, let go of paddle, grab pump and pump 2 handed. No - that won’t work either. So I’m left with the idea of an in-situ foot pump. I chased this idea on the internet and came up with the Whale Baby Foot Pump made by Munster Simms Engineering Ltd. The Baby however is designed to work with pure water, not the grit & trash that sometimes (frequently) appear in the bottom of my kayak. Aiden at Munster Simms told me that they do make a kayak specific bilge pump, a modification of the Henderson Chimp Mk1 and he kindly sent the technical drawings. The kayak pump is designed for sea kayaks and to mount on a foot rail - but see my safety comment in the footplate section above and the fact I’ve already fitted this kayak with a footplate. This kayak pump should be far easier to adapt to use in my kayak than a hand operated bilge pump and it should deal with the “bits”, so I ordered one.
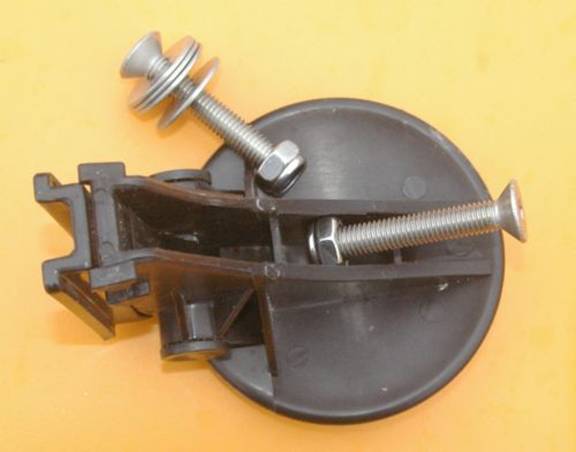
In the above picture you can see my footplate, with the karrimat “doughnuts”, the Henderson Chimp Kayak pump (from Munster Simms Engineering Ltd), stainless hose clips, 1” reinforced hose and 1” skin fitting (from Shipshape Marine), and a 45 degree plumbing fitting from B&Q that I thought I could adapt as a water intake. The kayak pump has a pair of aluminium supports (shown detached above) to affix it to a foot bar and a nicely machined marine ply foot plate, though I‘ll not be using either of those. A cheap modelers drill (from Aldi) was adapted to allow it to cut circles.
A circle was cut in the footplate and a collar was made in the same material, though in the end I didn’t use the collar.
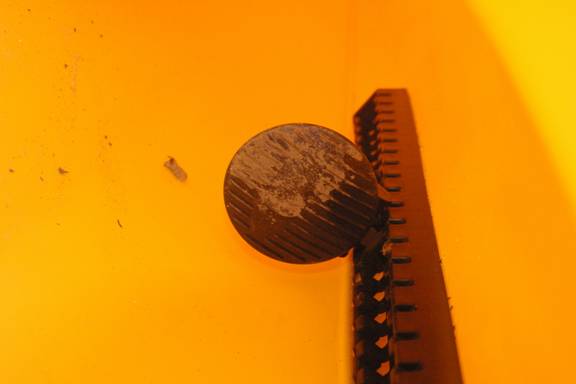
Having previously plugged the holes in the skin of my kayak I now made one, to take the skin fitting through which water will be pumped out.
A round plastic pump pedal was cut using my adapted modelers drill and fitted to the pump using stainless flanged bolts. These and the longer flanged bolts that allowed the pump to be mounted behind my footplate were sourced from eBay
Here’s the rear view and showing a neoprene gasket I cut out for the skin fitting.
... and here’s how the pump will mate to the skin fitting.
And whilst I’m at it here’s my first attempt at adding buoyancy, bags from wine (well in this case Weston’s Cider) boxes.
And the pump/footplate in place ...
The water collection hose was curled round and wedged under the seat (lowest point). I needed a further cutout in the footplate to bring the hose past. It’s just about possible to poke wine (cider) bags under the footplate and inflate them using a straw widened with electricians tape ... but more thought on buoyancy is needed. I really like the look of the fitted pump. This picture shows the routing of the water hose, nicely out of the way of my feet.
So did it work? ... No! ... at least not yet. I took the kayak to Kidsgrove Pool yesterday, filled the kayak with water (I’m really good at this bit) and tried the pump. No water came out through the skin fitting but the pump was nicely swirling the water in the kayak. The pump was pumping but the wrong way ... so either I’d fitted it wrong way round (I didn’t think so) or the outlet was blocked and the inlet non-return valve had failed. At Kidsgrove Pool I rolled the 100 for the first time, true the spraydeck came off again and it half filled with water (so easier to roll) and when I got it upright it started to sink stern first. I really must sort out some buoyancy inserts for this thing! So what went wrong?
The reinforced hose is supposed to bend whilst maintaining a functional water route, mine didn’t and with no exit the inlet one way valve flap was pushed back down the inlet hose when I pressed the pedal. Lovely fail safe design to the pump, I poked the valve back into place with my finger and then tested the pump in the bath, nothing broken & it now works fine again, I just need to use a couple of 90 degree bends to ensure the outlet hose doesn’t kink and my foot pump should be up and running as intended. I needed a tight 90 degree bend from the pump. Aiden at Munster Simms suggested their purpose designed one, cat. EB3364. MailSpeed Marine had one in stock and sent it straight out. The hose was another problem, I really needed a far more flexible and preferably lighter hose, eBay to the rescue ... caravanaccessories seemed to have just the stuff and 90 degree bends to suit this hose too. Apparently the Munster Simms pump & elbow don’t take kindly to glues but this was no problem as the elbow was such a tight fit on the exhaust port that I had to resort to a rubber mallet to get it fully on, I can still rotate it but I think it’s on to stay.
As you can see all the reinforced hose was replaced by flexible hosing, I used a 90 degree bend to bring the input past the foot plate and into the cockpit though this wasn’t really necessary. Using this hose made the fitting really easy this time. I had to use a stainless jubilee clamp to affix the hose to the skin fitting outlet but for everything else push fitting seems fine. I stuffed the bow with inflated cider bags for buoyancy as last time, bolted the footplate/pump back in place and routed the flexible hosing as I’d done with the previous hose.
So did it work this time? I was pretty confident as when tried at home it was nicely pumping air out through the outlet ... so I didn’t try it with water till I took it back to Kidsgrove pool. At the pool it proved to be really good for doing Whale impersonations, hence the name of the pump I suppose. It’d still take quite a while to empty the kayak using the pump - but you can do that whilst you are still paddling around ... brill. Front end buoyancy was sorted with empty wine/cider box inner bags as mentioned above. Now to sort the stern to prevent that “rear end” sinking feeling. Bits & pieces 1 metre length of knotted netting and fine shockcord from from Shipshape Marine Assorted empty wine/cider box inner bags and 2L plastic pop bottles
3mm holes were drilled at 3” spacings (2” where the curves were tighter) all around the cutout behind the seat (see above picture). Inflated cider bags were pushed under and around the rear compartment depression. The rest of the space was stuffed with sealed empty 2L pop bottles. One line of thread was unpicked from the net to give two 1 metre long narrower nets, the width of one was gauged to span the width of the kayak cut out. The ends were bunched and whipped.
The shock cord was then threaded round tying the net (and bottles etc) in place. Does it work? ... Yes, gone is that “rear end” sinking feeling when she’s filled with water ... I can happily play “failing to roll” for ages without a spraydeck. I can even hook the paddle in place with it’s retention cord on the inverted kayak, swim into place in the upturned craft and have yet another go at getting it upright. Buoyancy Update... I’ve put some hooks I had kicking around at the top and bottom of the netted area, now it takes seconds to unclip to remove or add buoyancy bags &/or bottles
My kayak has polystyrene shims pushed in place between the seat stanchions and the outer hull as stiffeners. These were alright to start with but with usage have become slightly compressed and now wash out of position each time I get water in my boat. I could glue them in but I’d prefer something more robust. Closed cell foam akin to the hip pads was prohibitively expensive so I searched to find something else that might do. What I found was architectural modelling foam as used to make surfboards. I talked with the people at Homeblown and ordered two small blocks to suit. I tried shaping the blocks to a slightly different, larger, profile than the polystyrene originals but then they wouldn’t push into place. So I resorted to making a cardboard template from one of the originals and copying them in architectural foam. The foam is a dream to shape with saws, a surform and sandpaper. I decided to route my bilge pump hose through one of my new shims. To do this I carefully pushed a rod (I used an arrow) through one block to make a hole right through and used this track to guide a hole saw through the block. Plumbers pipe was cut to length to line the hole. The finished shims had quite a powdery/gritty surface so I painted them with several coats of gloss metal care paint from Aldi before fitting them. The shims and hose route tube were glued in place using Sikaflex 291 marine adhesive sourced from Shipshape.
As you may have seen in the above two pictures my hip pads don’t look quite like they did when first fitted. The curve of my seat together with flex of the pads managed to break the original “self stick” adhesive backings. I scraped off the self adhesive webbing and tried Sikoflex 291 instead. Circa 4 weeks later the pads popped off again. I’ve now resorted to drastic measures. The area that the pads were attached to was thoroughly cleaned and then roughened with sandpaper. The pads were cleaned and shaped to better fit the profile of the seat. 2 bits of plastic tube were made from a plastic drawer handle, drilled and threaded to suit 6mm bolts. The pads were held in place and the areas that most needed to be pressed in place were marked and then carefully drilled, The pads were held in place again and 6mm holes drilled through the seat stanchions using the pads as guides. Two 5”x1” pieces of plastic, from the same material I used to make the footplate were drilled and tapped near one end to 6mm. Stainless bolts were screwed tightly in place through these. These plastic handles allowed me to push the bolts between the seat and the shim so that I could get the threaded end to come out through the hole drilled in the seat stanchion. If I had not already glued my new shims in place I could have easily put the bolts in without this fuss. The threaded plastic tubes were then screwed in place onto the protruding bolts. The holes through the pads were pushed over the plastic tube and the pads pushed on tightly so that the tubes could be marked for length and then cut. Sikoflex 291 was worked into the both the mating surfaces (stanchion & pad) using an old credit card. The pads were pushed in place and screwed down using stainless 6mm bolts and the plastic washers that are used to affix corrugated roofing. The pads were further held in place by two 15 mm lengths of copper pipe, these fitted beautifully over each pad and locked in place under the cockpit rim before and aft of the stanchions without even having to bend it. A spreader clamp was also put between the two pads to hold them in place. The whole was then left for 2 days to ensure the glue had well and truly set before the clamp and pipes were removed. The plastic washers were profiled to shape using a sanding disc on the Dremel drill. And the result is ....
.... lets see if they manage to pop off again. Safety note ... The pads hold me in along their top edge, so I won’t get poked by the bolts even if I get rammed from the side.
|
|||||||||||||||||||||||||||||||||||||


| [Home] [Where we meet] [Minutes] [Events etc] [Photos] [Videos] [Kayhacking] [Members Area] [Canoe England] [Ocean Paddler] [Links] [Contacts] |